Wednesday, October 5, 2022

One-Roll Star System

One of my favorite RPG books to just read through is GURPS (4E) Space. I have, due to whatever sickness I suffer from, read the sections about generating star systems and planets probably a dozen or so times over the years. It's a very nifty, nitty-gritty, crunchy experience of discovering what kind of star(s) your system has, what kinds of planets would most likely orbit it (them), how large their orbits would be, where the Habitable Zone for each system is likely to be, etc. It's pretty exhaustive.

It's also pretty exhausting.

I've gone through the process, I think, four times for no reason other than my own amusement and I think I've wound up with a star system full of dusty dead planetoids that is hard to imagine wanting to explore, let alone colonize, pretty much every time.

You can force the system to give you a Garden World, but that always feel vaguely... dishonest? Like a cheat code.

Somehow, despite the high-esteem to which I hold the system, the end result always leaves me feeling let down. "I cranked through all these tables for this?"

To give you a sense of the fun you've been missing out on, here's what it looks like:


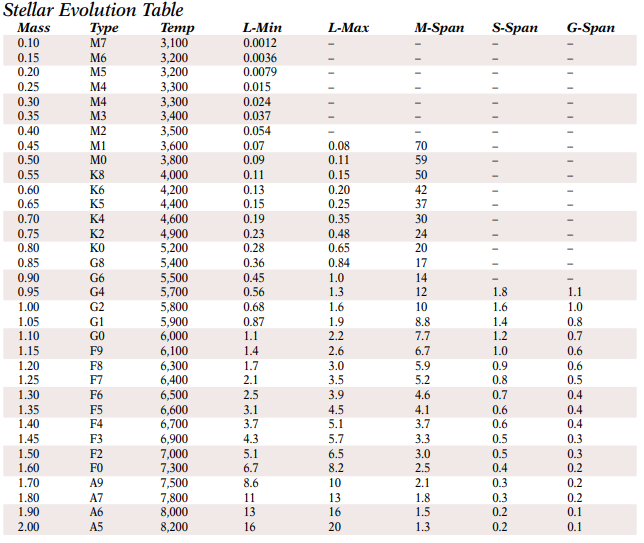
It's like this for, like, 40 pages.

It's very cool. But it's very much a slog.

So, I'm always on the lookout for faster ways of generating star systems and planets and, well, there are actually a number of options for doing this quickly on the computer. 

Donjon offers star system creation in three different flavors, in fact: Star Wars, Traveler, and Generic. The generic sci-fi one pumps out results pretty similar to what you would get from GURPS Space. And you get it instantly, rather than chugging through a bunch of tables and spinning the multiplication crank.

But for me, this has two shortcomings:

1) It's cool to know the exact radius and surface gravity of a planet. It's nice, I like it. But also who cares? It's like if every time I rolled for weather in Dolmenwood it told me: it's 78 degrees F and then told me separately what the humidity was. Just tell me if it's hot or mild!

2) It's actually too fast. While GURPS Space may be laborious, it also takes long enough that your keep thinking about how to implement whatever ice-rock feature you've just rolled up will fit into your story or game. So when a Star System generator spits out the bare stats of a planet, my mind goes blank. There's no spark.

It is fun to know that my habitable planet's gravity is 77% that of Earth as opposed to, say, 73%. Fun, but not useful

I really don't want it to seem like I'm knocking these systems. I'm sure they work for other referees or world builders. They just don't hit the right notes for me personally.

There's writing advice that goes something like, "Write the stuff you want to read." I'm going to try to take this advice, as amended: "Write the tables you want to roll on."

One-Roll Star System Generator

I lied. Technically, there are two rolls:

First, to determine the type of star your planets orbit.


Because the point of this process is rapid development, I’ve limited the following table to the least-exciting Main Sequence Stars (dwarfs), presumed to be in the middle of their lifespan, because this makes them the most-likely candidates for evolutionary success. They're more stable and long-lived than other stellar options.


If you want a more “realish” distribution of star results, use d100


If, on the other hand, you don’t want to roll Red Dwarfs over and over, use 1d10.


Main Sequence Star

1d100

1d10

Type

1-76

1-5

M-Type

77-88

6-7

K-Type

89-96

8

G-Type

97-99

9

F-Type

000

10

A-Type


M-Type Stars (Red Dwarf)

.3

.6

1

1.5

2

2.5

3.5

4.5

5.5

7

8.5

10

12

14

16

18.5

21

23.5

26.5

29.5

1

2

3

4

5

6

7

8

9

10

11

12

13

14

15

16

17

18

19

20


K-Type Stars (Orange Dwarf)

.3

.6

1

1.5

2

2.5

3.5

4.5

5.5

7

8.5

10

12

14

16

18.5

21

23.5

26.5

29.5

1

2

3

4

5

6

7

8

9

10

11

12

13

14

15

16

17

18

19

20


G-Type Stars (Yellow Stars)

.3

.6

1

1.5

2

2.5

3.5

4.5

5.5

7

8.5

10

12

14

16

18.5

21

23.5

26.5

29.5

1

2

3

4

5

6

7

8

9

10

11

12

13

14

15

16

17

18

19

20


F-Type Stars (Yellow/White)

.3

.6

1

1.5

2

2.5

3.5

4.5

5.5

7

8.5

10

12

14

16

18.5

21

23.5

26.5

29.5

1

2

3

4

5

6

7

8

9

10

11

12

13

14

15

16

17

18

19

20


A-Type Stars (blue/white)

.3

.6

1

1.5

2

2.5

3.5

4.5

5.5

7

8.5

10

12

14

16

18.5

21

23.5

26.5

29.5

1

2

3

4

5

6

7

8

9

10

11

12

13

14

15

16

17

18

19

20


Determine Planetary Orbits

The second roll is the big one. Here we determine what planets go where.

Each die represents a planet (don't use the 10s die):

d4: this die represents your Small Terrestrial Planets (ST). e.g., Mercury, Mars, the Moon, etc.

d6: represents Medium Terrestrial Planets (MT). e.g., Venus, Earth

d8: represents Large Terrestrial Planets (LT). e.g., super-Earths or mini-Neptunes

d10: represents asteroid belts (AB)

d12: represents Ice Giants (IG) e.g., Neptune, Uranus

d20: represents Gas Giants (GG) e.g., Saturn, Jupiter 


Steps:

  1. Drop your dice

  2. Interpret Results: each die result represents the planet’s distance to its parent star

  3. Adjudicate Ties:

    1. If a Small and Medium terrestrial planet are on the same orbit, replace them with an asteroid belt

    2. If an asteroid belt coexists with any planet, the planet “wins” and gains a ring system

    3. In all other circumstance, the larger planet “wins” and is upgraded to a larger class of planet: e.g. Large Terrestrial Plant → Ice Giant → Gas Giant → Super-Jupiter

  4. Determine Number of Moons: subtract 2 from each die roll


Example 1

  • G-Type Star

  • d4: 4

  • d6: 4

  • d8: 4

  • d10: 6

  • d12: 8

  • d20: 20


d8 would normally be a Large Terrestrial planet, but since over the course of its development, it ate up d4 and d6, it’s an Ice Giant instead. But it’s also too close to its parent star (coming before the asteroid belt), so its atmosphere has been stripped away and resulted in a massive Ocean Planet (OP).

d10 is an interrupted Asteroid Belt (AB).

d12 is an Ice Giant (IG)

d20 is a distant Gas Giant (GG)


1

2

3

4

5

6

7

8

9

10

11

12

13

14

15

16

17

18

19

20


OP


AB


IG


GG


Moons:

  • d8: 4 - 2 = 2

  • d10: asteroid belts don’t have moons, but they may have moon-sized planetesimals. 6 - 2 = 4.

  • d12: 8 - 2 = 6.

  • d20: 20 - 2 = 18


We’ll determine moon types and orbits later.


Example 2:

  • M-Type (Red Dwarf)

  • D4: 1

  • D6: 4

  • D8: 5

  • D10: 1

  • D12: 5

  • D20: 13


d4 & d10: I’m doubtful that a Small Terrestrial planet could hold onto a ring this close to a star, but Red Dwarfs are pretty small, so let’s say it managed to maintain a ring of dust and small debris.

d6: A Medium Terrestrial planet which would have been in the CHZ of a star like the Sun, but here is frozen, out in the cold.

d8 & d12: The Ice Giant eats the Large Terrestrial planet.

d20: 13 is normal Gas Giant (GG)


.3

.6

1

1.5

2

2.5

3.5

4.5

5.5

7

8.5

10

12

14

16

18.5

21

23.5

26.5

29.5

1

2

3

4

5

6

7

8

9

10

11

12

13

14

15

16

17

18

19

20

ST


MT

OP


GG


Moons:

d6: 4 - 2 = 2

d12: 5 - 2 = 3

d20: 13 - 2 = 11


Example 3:

  • K-Type Star

  • D4: 2

  • D6: 6

  • D8: 7

  • D10: 5

  • D12: 1

  • D20: 3


This is a chaotic one! It’s sort of a weird, dense, inside-out star system.


D4: Small Terrestrial Planet, right in the middle of the CHZ.

D6: Medium Terrestrial Planet, quite frozen.

D8: Large Terrestrial Planet, also frozen.

D10: Asteroid Belt

D12: Is an Ice Giant--but orbiting its star at less than 1 AU! That makes it an Ultra-Hot Neptune. These weird planets which are not well-understood by science. But see Glossary.

D20: to make things crazier, this star also has a close-orbiting Gas Giant. Most likely, the GG and UHN migrated inward from their original, unstable orbits. They probably threw other orbits out of whack, which is maybe why the terrestrial planets are on the outside of the system rather than on the inside. The exterior planets might even be migrating out of the system depending on how jarring the transitions of the UHN and GG were.


What a weird doomsday scenario for anyone that might have evolved on the MT planet.


.3

.6

1

1.5

2

2.5

3.5

4.5

5.5

7

8.5

10

12

14

16

18.5

21

23.5

26.5

29.5

1

2

3

4

5

6

7

8

9

10

11

12

13

14

15

16

17

18

19

20

UHN

ST

GG


AB

MT

LT


Moons:

UHN: 0

ST: 0

GG: 1

AB: 4 planetesimals

MT: 6 - 2 = 4, but if it originated from further in the system it probably really only has 1 or 2.

LT: 7 - 2 = 5

Where to Next?

So, obviously this is a little clunky as it stands. I'm hoping to clean it up and make a nice, readable PDF in the coming weeks.

I don't really think there's a reason to have fractional AU distances on the system tables past Orbit 10. Does really matter much if a planet is 23.5 AU rather than 24 AU from it's star? I mean, I'm sure on an astrophysical/planetary scale it matters, but does it matter to you?

The process for setting up moon orbits is pretty much identical to this, with a planet instead of a star, but I think it needs more thought before I post it.

Anyway, let me know what you think!

Planets & Polyhedrons

Current project: a dice-rolling system for rapid sci-fi sandbox generation! 

Table of Contents:


Test Sector


[This page is going to evolve over time as I think of new stuff to add] 

Dice-Drop Sub-Sector Generation

[This is part of a series of rules I'm putting together to make generating a sub-sector in a sci-fi setting fast and easy, leaning heavily on Dice-Drops and One-Rolls. These will eventually be cleaned up and compiled into a PDF to make a wholistic system. For more along these lines, look here. Thanks!]

This is probably the simplest part of the process of generating a sector of space, from the user's perspective, but for me, it's been one of the weirder processes of coming up with the rules.

The first part is really simple. Get yourself some hex graph paper. I'm using a 5x7 grid because I think there's a lot to be said for a small map. And the whole point of developing a rapid system for stay system generation is to make it easy to add new sub-sectors to a campaign, so keeping star maps small seems appropriate to me.

Then drop a standard set of polyhedral dice: d4, d6, d8, d10, d12, d20, and d10s. Personally, I got a better spread over the map by splitting the dice between both hands before dropping. Just a pro tip there, you're welcome.

Each hex is equal to 5 light years (the average distance between stars in the Milky Way). The dice represent the location of a star system somewhere within one of those hexes.

Then add jump-lanes between your stars (they should pass through no more than 2 empty hexes).

You'll get something like this:

Simple so far.

The problem is, I want this system to be really efficient. I want to get as much narrative value out of every role made. We got location and travel routes out of the drop, but we've got all these numbers. What to do with them?

Interpreting the Stars

The first problem I had was just trying to figure out what the numbers might represent. My first though was they represent the stellar type of the star in question. But I already have a quick way of doing that in my Star System generator.

Then I thought maybe it was indicative of some sort of spatial anomalies, but I have an idea of how to do that later.

So I decided that I would like a table that used the results to indicate what sort of space-faring population one might expect to encounter here.

At this tentative time, my operating assumptions are that this ruleset describes a universe like Star Trek or Star Wars, where there's an over-abundance of sapient, technologically advanced societies. So, while there's plenty of "frontier space," there's also little in the way of unclaimed space.

The first thing to get a handle on was how a single table interpreting the rolls of all seven polyhedral dice was going to work statistically. This is how I wound up visualizing it.

It's a weird spread!

There are 28 possible results.

Ranked from most frequent to lease frequent:
  • 1, 2, 3, 4
  • 5, 6
  • 7, 8, 10
  • 9
  • 11, 12, 20
  • 30, 40, 50, 60, 70, 80, 90, 100
  • 13, 14, 15, 16, 17, 18, 19

Obviously, the most frequent results will be 1-4. Because of the d4, you're guaranteed to get a result of 1-4 at least once. These four things have to be something you won't mind popping up more than once in a single map. To me, these seem like they should be of some aid to players, like taverns and inns. Places where you can find supplies when you need them, even if they're not the best supplies, and maybe get some rest.

1. Explorer Fleet (traders in dnd terms)
2. Frontier Settlement (town)
3. Abandoned Colony (dangerous, but will have supplies)
4. Service Station (for patching up star ships)

I opted to make results 5-20 story-oriented stuff: unexplored locations, locations run by rival powers, or isolated alien enclaves, etc. 30-00 are astronomical phenomena that imply inhabitability of nearby planets, but might be of interest as plot devices or hazardous encounter locations. As it stands now, the list is like this:

1. Faction 1 Explorers
2. Faction 1 Frontier Settlement (pop. 1d10*100)
3. Faction 1 Abandoned Colony 
4. Faction 1 Service Station (pop. 1d6*10)
5. Unexplored
6. Frontier Colony (pop. 1d10*1000)
7. Abandoned Rival Colony 
8. Ancient Ruins
9. Faction 2 Settlement (pop. 1d6*10)
10. Faction 2 Explorers
11. Faction 1 Tamed Planet (pop. 1d20*1,000,000)
12. Faction 2 Colony (pop. 1d10*1000)
13. Faction 2 Populous World (pop. 1d10*1,000,000,000)
14. Uncontacted Alien Homeworld
15. Independent Alien System
16. Faction 1 Megalopolis (pop. [1d10+10]*1,000,000,000)
17. Faction 2 Tamed Planet (pop. 1d20*1,000,000)
18. Faction 2 Megalopolis (pop. [1d10+10]*1,000,000,000)
19. Faction 1 Populous World (pop. 1d10*1,000,000,000)
20. Alien Megastructure
30. Worm Hole
40. Nebula
50. Planetary Nebula
60. Supernova
70. Pulsar
80. Neutron Star
90. Magnetar
00. Black Hole

Looking back at the map:


My philosophy on the statistical likelihood of Faction 1 appearing vs Faction 2, is that almost every epic space story I can think of involves various factions vying for influence in sectors in which their powers are imbalanced (even if their overall power is fairly balanced). 

Star Trek fans would probably find the easiest analogue to be conflicts between the Federation and Dominion. The Dominion was very powerful but struggled to gain a strong military foothold in the Alpha Quadrant, while the Federation was also very powerful but couldn't get much of a military foothold in the Gamma Quadrant.

Star Wars fans might read the above map in terms of Faction 1 being the Empire and the Abandoned Colony from Faction 2 being a former Rebel base. Hell, it could be Hoth.

Warhammer grognards might see Imperial colonies and a failed T'au expansion colony.

The Magnetar, meanwhile, represents a neutral regional threat. It's probably periodically (1d10 decades) puking out significant amounts of radiation into the surrounding region. Perhaps that's why the this sub-sector is relatively unpopulated. But there must also be something good in the neighboring star systems for colonists and settlers to put up with the constant threat of gamma-ray bursts.

I'm not sure if I'll bother making up my own Faction Creation scheme, because I'm not sure I have anything new to bring to the table that Stars/Worlds Without Number hasn't already done.

My current concern with the table as it stands is mainly that it may be too biased toward underpopulation. But, space is vast and empty. So I'm comfortable with it for the moment.

Update 10/6/22: I realized that if unusual stellar objects were linked to the d10s they were going to be showing up all the time because each one has a 10% chance of appearing every roll with at least one guaranteed to, so I decided to swap stellar objects with population-related objects:

1. Faction 1 Explorers
2. Faction 1 Frontier Settlement (pop. 1d10*100)
3. Faction 1 Abandoned Colony 
4. Faction 1 Service Station (pop. 1d6*10)
5. Unexplored
6. Frontier Colony (pop. 1d10*1000)
7. Abandoned Rival Colony 
8. Ancient Ruins
9. Faction 2 Settlement (pop. 1d6*10)
10. Faction 2 Explorers
11. Alien Megastructure
12. Worm Hole
13. Nebula
14. Planetary Nebula
15. Supernova
16. Pulsar
17. Neutron Star
18. Magnetar
19. Black Hole
20. Faction 1 Tamed Planet (pop. 1d20*1,000,000)
30. Faction 2 Colony (pop. 1d10*1000)
40. Faction 2 Populous World (pop. 1d10*1,000,000,000)
50. Uncontacted Alien Homeworld
60. Independent Alien System
70. Faction 1 Megalopolis (pop. [1d10+10]*1,000,000,000)
80. Faction 2 Tamed Planet (pop. 1d20*1,000,000)
90. Faction 2 Megalopolis (pop. [1d10+10]*1,000,000,000)
00. Faction 1 Populous World (pop. 1d10*1,000,000,000)

Looking back at the map. The only thing this would change is the Magnetar. Suddenly, it's a Megalopolis planet associated with Faction 2. This changes the sub-sector a lot! 

For one thing, it went from unpopulated to over-populated. Faction 2, while controlling fewer star systems vastly outnumbers Faction 1. But Faction 1 controls the jump-lanes for some reason. This is now going to result in much more populous regions.

There may be something to be said for having two different table arrangements. Pick one variant for frontier space, pick another for more "civilized" space. Something to consider.